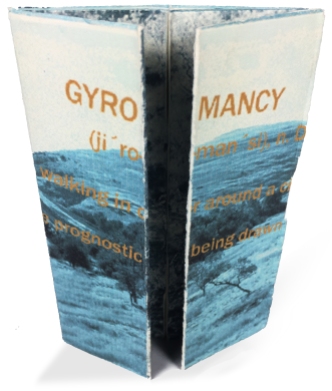
To commemorate the 20th Anniversary of the Gyromancy project, I mined copies of the images from the Wayback Machine. So, if you like the idea of a digitally delivered artist’s book, or you just need someone to keep an eye (or two) on you, enjoy!
About the project:
When I got back to my studio in 1999 after spending a couple weeks in upstate New York at Ed Hutchens’ Book Arts Jamboree, I was fired up. Working with Ed, Emily Martin, and Susan Kapuscinski Gaylord and meeting pals like Sara Durkacs was just what my isolated Eastern Oregon practice needed. I was living at the base of the foothills of the Blue Mountains in the middle of visually stunning landscape. My seemingly aimless, twirling life had landed me there, and this book was a tribute to that, with a nod to Frida Kahlo’s Self Portrait as a Tehuana.
I created the images on a PC that had what I considered at the time to be the end-all of high power; it had 48 Mb of RAM. A link was posted on Peter Verheyen’s Book_Arts-L, a forum that was and continues to be part of the lifeblood of the book arts community. Within days I received emails from across the country and around the world. Sometimes I had to pick up an atlas to find the location of a small country or far-flung island. I received the last email seven or eight years ago.
The original high-res images may be living on a zip drive somewhere in the basement, but with no reader, they’re virtually gone. Unfortunately, the Wayback Machine screen captures are a little worse for wear – sorry about that.

From the original instructions:
Gyromancy is a collaborative project that was designed and uploaded to the web at Mission Creek Press then printed and assembled by artists around the world. I invite you to participate by following the three basic steps listed below. Permission to copy information is extended to printing the book parts only, and not to the other images and text in this project.
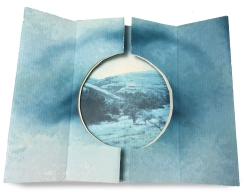
The structure used for this book is a morphing of a French door format made from one sheet of paper and a pop-out feature used in an eight-page one-sheet zine structure. Ed Hutchins taught me the French door format; the pop-out, often used to create a ‘Riddle Book,’ was something I learned at Book Arts Jamboree in 1999. I can’t remember who passed it along – it may have been either Mary Flores or Susan Kapuscinski Gaylord, or it may have been Ed.
The three steps to participating:
1. Print the book pieces here and here. Occasionally, a browser/printer combination will cut off a small portion of the right side of the large image, causing the first fold to be off center. Feel free to copy and paste these images into another program, where you can fiddle with the overall dimensions. The page proportions however should stay the same for everything to fit right. Use a quality paper with a color laser or inkjet printer. The heavier the paper, the more useful a little strap or slip case will be in keeping the book closed nice and flat.
2. Assemble the pieces by following the instructions below. Many thanks to my daughter who was a great hand model. (Editor’s note: she was 11 at the time, and not happy about being conscripted to help with this project. Now, as a 30 year old with a family of her own, she’s more forgiving.)
3. Document your copy by signing your name in the space on the back of the book. This is an open, numbered edition. The number for your copy will be your initials followed by today’s date, minus the year. (i.e. RLL0521). Send an email to me at robertalavadour (at) gmail (dot) com with the following information:
a. Your name and location
b. The number of your copy
c. The paper used, the printing method and the size the book was printed
d. A brief description of any slip case or strap added to the book.
Thank you for your participation. I hope you’ll enjoy this project as much as I have – I look forward to hearing from you.
INSTRUCTIONS
1. Trim just to the printed area on all four sides of the image. 2. Fold the paper in half ‘hamburger’ style, then turn the paper around so that the top leaf opens in the direction of a greeting card.
3. Bend back the top leaf so that the edge meets the first fold. 4. Flip the page over and repeat.
5. Turn the folded paper in front of you so that if you picked up the top leaf only, it would open in the direction of a greeting card. Fold just the top leaf backwards to match it up with the fold on the left. Flip the paper over and repeat. 6. Reverse the direction of the center fold and crease. (As I say to kids, you now have two little teepees inside one large teepee)
7. Place your hands between the two inner teepees and bend the section back to match the single fold on the left and crease. 8. Turn over and repeat.
9. Pull page firmly open. You should have eight equal panels. 10. Fold the page in half ‘hot dog’ style and unfold. NOTE: The photo (above/right) mistakenly shows that the white side of the page will be on the outside. Fold yours so that the printed area will show on the outside when you fold.
11. Fold over the first two panels on the right and cut through the center fold just to the next fold line. Repeat on left side of the page. 12. Let the page fall back into the “hot dog” fold while pushing towards the center so that two x’s are formed.
13. Cut out the white circles with the page folded. Check both sides to make sure no white area remains.
14. Cut out the eyes from the printed sheet and glue the rectangles to the bottom layer, under the openings, matching them up with the printing on the main page. 15. Re-crease the folds that now have the extra layer underneath.
16. Push the end panels in again and bring the pages pointing towards the table out towards the side of the page nearest them, set on the table. 17. Pull each the pages around to the front, one set at a time and boning down as you go.
The pages can be “read” in any order, and pulling on the ends of the second set will disclose the hidden images. A small paper slip case or strap (not shown) will keep the book closed nicely for storage.


